Monday, November 23, 2015

Easy Makeup for Glasses | Maquillaje Facil Para Lentes


This makeup is quick and simple. Super easy for those days where you have to get ready in a pinch. It also looks real cute with glasses. I wear my glasses almost everyday for work and this makeup is simple and I get it done in 10 minutes.

The list of all the products I used are listed below.


Products used in this video:

Smashbox Photo Finish Primer
L'Oreal True Match Lumi Foundation
Maybelline Fit Me Concealer
Laura Mercier Setting Powder
Lorac Pro Contour Palette
Milani Romantic Rose Blush
The Balm Mary Lou Minizer highlighter
MakeupGeek Shimma Shimma eyeshadow
MakeupGeek Vanilla Bean eyeshadow
Maybelline Lash Stiletto Mascara
Benefit They're Real Mascara
NYX White Liner Pencil
NYX Beige Mega Shine Lip Gloss
Urban Decay All Nighter Makeup Setting Spray


Check out the Spanish Tutorial here:


Daytime Glam Makeup Tutorial | Maquillaje Oscuro Para el Dia


I am living for the dark smoky eyes lately. In this tutorial I show you how I got this super easy look if you want to rock a dark eye  for the day time. I love doing my own thing. Below are is the list of the products I used!


Products used in the video:

Ponds Anti-wrinkle cream
Smashbox Primer
imagic cream color palette
L'Oreal True Match Lumi Foundation
Beauty Blender sponge
Maybelline Fit Me Concealer
Laura Mercier Setting powder
Lorac Pro Contour Palette
MAC Mystery eyeshadow
MAC Cork eyeshadow
Too Faced Chocolate Bar Palette
NYX Eyebrow Shaper
Hourglass Ambient Lighting Powders
Milani Luminoso Baked Blush
Becca Champagne Pop Highlighter
Maybelline Lash Stiletto
Benefit They're Real
Urban Decay Black Pencil Liner
L'Oreal Color Riche Extraordinaire Mauve
Urban Decay De-Slick Setting Spray


I am going to be making my videos in Spanish on my new Spanish YouTube channel: El Efecto de Soriam.

Here is the first video in Spanish! If you like the videos, subscribe like and share!


Este es mi primer video en EspaƱol! Espero que les guste. Estare haciendo mas videos pronto!

Thursday, November 19, 2015

Primer | Makeup Part 1 | Back To Basics


I am so excited to be getting into the makeup part of my huge back to basics series. If you haven't already checked out my Skin Care Back to Basics mini series, go read all about it: Part 1, Part 2 and Part 3!

In the Makeup mini series, I will be talking about all the basic makeup product that you need and also all the extra goodies that you can add to your makeup routine to get the look that you want. Makeup is all about accentuating what you already have, and it's a ton of fun to play with.
I will be putting these posts up in the order that you would apply the makeup.

I am starting out with primer. Primer is intended to do exactly as it says, it is made to prime your skin before you go in with any other product on top. Primer is used to fill any lumps, bumps and any unevenness that you may have on the skin to smooth and even out the surface. Primer also is made to make anything that you put on top last all day long.

You can apply primer with your clean hands, you can also use a clean brush or even makeup sponges. Really it is up to you. I always just use my fingers to work the primer into my skin. It's super fast and I don't get any of my tools dirty.

There are many different types of primers that are used for all kinds of things. There are just regular primers that the sole purpose is to even out the skin tone and make the makeup last all day. These primers are intended to be used by any skin type. Here are a few examples of regular primers.


There are also primers that are made for people that have oily skin. These sort of primers usually will say that they are mattifying. These will make your skin look matte as soon as you apply them to the skin. They prevent oil from escaping during the day. Some people even use these sort of primers even if the are not wearing makeup to reduce the amount of oil that will show on the skin. Here are some examples of what a mattifying primer looks like. As you can see there are great options for any budget. Honestly they all do the same thing, choosing one comes down to personal preference.

There are also primers designed for dry skin. These kind of primers usually tend to say things like "hydrating" or "luminous." These primers are made to make your skin look like its glowing from the inside out. These are also great to use in the cold winter months, when the skin tends to get dry. Again, all companies carry these. So there's something out there for everyone.

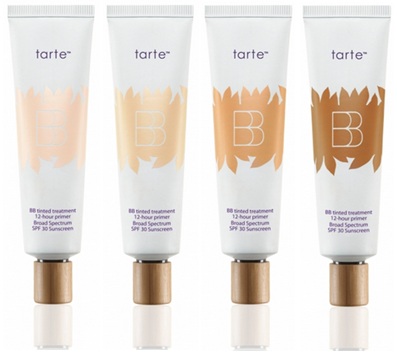
Also out there are tinted primers. These primers are made with a tone or color to them already. These are great for people that don't need the coverage from a foundation because the primer has a small amount of tint to it. These work great for a little wash of color all over the skin on days where a full coverage foundation isn't needed. These also work great for people that need a lot of coverage, because you can then layer your foundation over top and it will give you more coverage.


Another great thing that primer is used for is with powder foundations. When you use a powder foundation you really need to make sure that the powder has something to stick to. Using a primer is the best way to get your powder foundation to stick and to stay put all day.

Let me know what primers are your favorite and how you like to use them.

Next up on my Makeup Back To Basics series is foundation and concealers!


All pictures on this post are from Google.com for reference.

Friday, November 13, 2015

Fall Date Night GRWM | Makeup & Hair Tutorial

I am so happy that we are into Fall now. I came up with this date night look with dark smoky eyes and of course a dark red lip to go out to dinner with my husband. I love doing and making these Get Ready With Me videos. If you enjoyed this video like and share it!

Below are all the products that I used in this video:

Urban Decay Prep Spray
L'Oreal True Match Lumi Foundation
Maybelline Fit Me Concealer
Laura Mercier Translucent Setting Powder
Lorac Pro Contour Palette
MAC Mystery eyeshadow
MAC Cork eyeshadow
Becca Champagne Pop highlighter
MAC Soft Ocher Paint Pot
Urban Decay Smoky Palette
Maybelline Line Stiletto Liquid Liner - Black
Urban Decay Pencil Eyeliner - Black
Milani Romantic Rose Blush
L'Oreal Voluminous Carbon Black Mascara
Maybelline Lash Stiletto Mascara
NYX Soft Matte Lip Creams
Tresemme Heat Protection Spray
Goldwell Rich Repair Serum  


Monday, November 9, 2015

Evening Steps & Products | Skin Care Part 3 | Back to Basics


Your night-time skin care routine shouldn't be too different from your morning routine. As always you can add or take away things depending on your skins specific needs.

The steps and products in this post are the general steps that you can take to get better skin. You want to remember that these things aren't magical products that will work immediately. You have to get your skin into a routine and let the products work over time.

Step One: Removing Makeup

If you tend to wear makeup on an everyday basis, this is a step that you don't want to forget. Removing your makeup will kick start the cleansing process by getting rid of the majority of the stuff on your face before you go in with a cleanser. If you don't remove your makeup prior to cleansing, you will end up having to wash your face 2-3 times to get it really clean. This isn't always the best because some cleansers can really dry out your skin. This could make your skin produce more oil and be prone to breakouts.

Removing your face and eye makeup with wipes is the easiest and quickest way to get most of that makeup off. I really love the Neutrogena Makeup Remover Cleansing Towelettes. These wipes are super gentle and they work great to get through face makeup and waterproof mascara.

Step Two: Cleansing

When you cleanse you want to make sure that you are getting the last traces of makeup off and also making sure your skin is really clean. If you use a gentle cleanser, you can cleanse twice, it depends how your face is feeling and what it needs. You can use your hands or if you have a cleansing brush you can also use that. There are so many of these brushes on the market. They are designed to give your skin a super deep clean. It goes much deeper into your skin than just using your hands. An electric face brush is a great investment in your skin care.


Step Three: Exfoliating

Exfoliating is when you use an abrasive type cream to remove the dead skin cells off your skin. This is not something you want to do every day, since it can cause redness and sensitivity. You should exfoliate 2-3 times a week or as your skin needs it. Exfoliating helps with flaky or dry skin. There are many different kinds of exfoliants, there are more gentle are mild exfoliants that are made for sensitive skin, and there are also very abrasive exfoliants that are made for people with tougher skin that can take it, and many more in between. Depending on your skin type is the product that you want to choose.


Step Four: Toning

Toning is very important, as I talked about in my last post. Toning balances the pH levels of your skin returning it to a slightly acidic level instead of a slightly alkaline level. This is important to keep harmful bacteria and fungi away from your skin. This also helps close up your pores to minimize oil production and in turn minimize breakouts.


Step Five: Correcting/Acne Treatments

This step depends on what kind of skin you have. For acne prone skin this step is where you want to use spot treatments. If you don't have active acne, this step can be used to prevent any breakouts from occurring. Using a serum or beauty oil is ideal in this step. You want to make sure that your skin is hydrated so it can repair itself as you sleep.
There are many different beauty oils and serums. The one you choose depends on what kind of skin you have and what your needs are.


Step Six: Moisturizing

After the serum or beauty oil or any treatment has soaked into your skin, this is when you want to apply your moisturizer/night cream. Again this is going to help your skin look and feel softer and younger. It will return that moisture to your skin that toning usually gets rid of. The more moisturized your skin is the healthier it will look.
There are many different types of moisturizers. This like everything else is based on your preference and what your skin really needs. I love using an anti-aging cream, because these sort of creams have a ton of beneficial properties. You can never be to early to prevent wrinkles. The key is finding the cream that will work best for your skin.
You also what to use an eye cream to hydrate your eye area. The under eyes and lids are the thinnest skin on your face, and you want to make sure that you are taking extra care of this area.


These are the general steps for a night time skin care routine. As always you can customize and switch things up as you needed. Don't be afraid to try new things, it is a great way to get your skin to start working for you.

What are your favorite skin care products to use in the evening?

Check out the previous posts in the Skin Care mini series:

Skin Types | Skin Care Part 1 | Back to Basics


All images are from Google.com