Tuesday, August 30, 2016

Becca x Jaclyn Hill Champagne Collection Face Palette | Beauty Favorite of the Week

I absolutely live for this face palette! This face palette is quickly becoming one of my favorites.
I picked up the Becca x Jaclyn Hill Face Palette on a whim when I was at the mall a little over a month ago. It had been out for a while, and I was trying to keep away from it since I don't like things that are super trendy.

But after it was out for a while I looked at it in store and I actually really like the colors in the palette, especially when it came to the blush colors.

I have been using this palette pretty much every day that I wear makeup, which is like everyday. I definitely am obsessed. This palette is so beautiful, the blush colors are amazing and the highlight shades are gorgeous. I am also a sucker for pretty packaging, and of all the palettes that I own this one takes the cake. I love displaying it on my vanity!

It comes with three blush shades and two highlighters. The blush shades are different enough and they even have different finishes on the skin making each one unique. There is a more gold highlighter and a pink highlighter. I love the options. I even use the highlighters as eyeshadows sometimes.

The powder itself is super high quality. The colors are pigmented and they go on the skin smooth and creamy, and they blend like a dream. When you do blend out the blush colors they don't completely disappear off your skin.

The colors last all day on my cheeks and it doesn't get blotchy or patchy throughout the day.

Overall this is a definite winner, and I am so glad that I got it while it was available.

|| YOUTUBE CHANNELS ||

Beauty Channel: https://www.youtube.com/thesoriameffect4
Spanish Beauty Channel: https://www.youtube.com/channel/UCVp5erjTu3sPPV7pGKjOP8w
Vlog Channel: http://YouTube.com/SoriamTV


|| FOLLOW ME ON SOCIAL MEDIA ||

Instagram: https://instagram.com/the_soriam_effect/
Facebook: http://facebook.com/thesoriameffect
Twitter: https://twitter.com/SorrriamArrrce
Pinterest: http://www.pinterest.com/soriamarce/
Tumblr: http://sosoriam.tumblr.com

Friday, August 26, 2016

How to Wash Your Makeup Brushes

This little task of deep cleaning my makeup brushes is one that I don't particularly love to do. Although it is super necessary it is still a pain in the butt to do, especially when you have an ever growing collection of makeup brushes.

Washing your brushes with soap and water is so important though. This ensures that you are not reintroducing allergens, bacteria or any other gross thing back on to your face. I think this is much more important when it comes to the face brushes. Face brushes are the ones that are constantly used with liquid or cream products that can collect all kinds of bacteria and gunk.

In the video I show you how I like to wash my brushes. It is simple, doesn't take much time and the best part, it's cheap!

There are plenty of mitts or gloves or mats out there that are designed to help wash your brushes, but those things can be pretty pricey. I use the Real Techniques Brush Cleansing palette which was less than $15 on amazon (linked below.) This is the cheapest and most effective way that I have come across, and I love it.


Stuff I used:

Dirty face brushes
Dirty eye brushes
Water 

|| YOUTUBE CHANNELS ||

Beauty Channel: https://www.youtube.com/thesoriameffect4
Spanish Beauty Channel: https://www.youtube.com/channel/UCVp5erjTu3sPPV7pGKjOP8w
Vlog Channel: http://YouTube.com/SoriamTV


|| FOLLOW ME ON SOCIAL MEDIA ||

Instagram: https://instagram.com/the_soriam_effect/
Facebook: http://facebook.com/thesoriameffect
Twitter: https://twitter.com/SorrriamArrrce
Pinterest: http://www.pinterest.com/soriamarce/
Tumblr: http://sosoriam.tumblr.com

Wednesday, August 24, 2016

Bold Brows using ABH Brow Wiz

Eyebrows are definitely my favorite thing to do when it comes to makeup. They can really make or break a makeup look. This tutorial is showing you how I like to rock a bold brow. I have been really loving the darker bolder brow trend, and in the video I show you how easy it is to achieve this fun look. 


I used the Anastasia Beverly Hills Brow Wiz in the color Dark Brown, and then I set them with the NYX brow gel in the color Brunette. 

This combo has been a favorite of mine this summer. It is so fast and easy to get my eyebrows done! 


Wednesday, August 17, 2016

Long Layers Haircut | Behind the Instagram


The long layered haircut is probably my favorite haircut to do. It gives the hair so much body and movement, and makes the hair look 10 times thicker than it did before. 
This client is the same one from my Brown Ombre post, she came back to get her haircut, since we didn't have the time to do it when I colored her hair. 

Her hair was about down to her lower back. You can see in the first picture below that it looks very thin and flat.

I started by making sure her hair was completely wet. Then I sectioned her into a T parting from the top of her crown down towards her ears. I pinned the front two sections out of the way and started on the back first. 
I always like to trim the hair to the length that the client wants before I get into the body of the haircut. I took the back section and parted her hair from her left ear all the way across horizontally to her right ear. I like to take a big enough section to go through this as a rough cut pretty quickly. I took off about 3 inches of her length. I took down more sections working my way up the hair until her hair was one even length all over. 

Once I had the trim in, this is when I like to start layering. Always ask the client how short they want their shortest layer to be before you start chopping off hair every which way. My client wanted longer layers this time. 
To cut long layers I like to start at the top of her head with the back section. I divide about an inch section from the crown horizontally, this will be my guide for the shortest layer. 
I comb the hair straight up as perfectly as possible, and check to see how short the layer will be. I grip the hair tightly and bring it down to see where it will be once it is cut. 
I comb that section straight up again and I point cut that first layer. I took about 5-6 inches off for that first layer.
To continue the layering, I parted the hair from the top down vertically about 1-2 inches thick. I combed the hair straight up to the length of the original guide of the shortest layer. I go from the center to the left and then from the center to the right.
I worked my way down to the nape of the head, combing everything up to that original guide at the top of her head.

For the front sides, I like to part the hair from the center middle back to create a triangle shape. I angle the hair back at a 45 degree angle instead of the 180 degree angle that I did the back of the haircut. I do this because I don't like taking too much length off the front since there is much less hair in those front sections than the back.
I also don't cut the layers in 3-4 fingers above the ears. Again this is to make sure we leave some fullness and length in the front.

After the cut is completed, I like to blow out her hair and give it that body and curl with my round brush and blow dryer on the highest heat setting. And that's the end of the haircut.

I love this haircut, it is definitely my all time favorite haircut and blow out to do on my clients.  


|| YOUTUBE CHANNELS ||


|| FOLLOW ME ON SOCIAL MEDIA ||


Friday, August 12, 2016

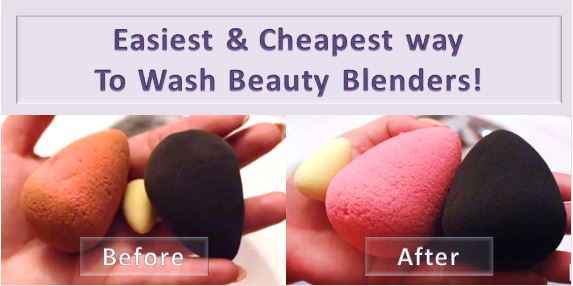
Easiest & Cheapest Way to Wash Beauty Blenders!!


In this quick video I show you the way I like to wash my Beauty Blenders. These makeup sponges are seriously amazing. But keeping them clean, fresh and stain free can be a hassle and sometimes really expensive.

You could be the Beauty Blender brand soap that they sell at Sephora or Ulta, OR you can use this super inexpensive soap to get your Beauty Blender clean!

What I like to use to wash and maintain my Beauty Blenders is a soap called Pink Zote, I picked this up at Walmart for under $1!! Seriously you can't beat the price and the amount of soap that you get.

The soap is super gentle and it doesn't irritate my skin at all. As long as you completely rinse out the makeup sponges when washing them, I don't see you having any problems with it!

Thursday, August 11, 2016

Summer Get Ready with Me | Makeup & Hair


My latest YouTube video is this Summer time Get Ready with Me. I love making these types of videos because they are my favorite to watch!

Check it out below:


|| YOUTUBE CHANNELS ||

Beauty Channel: https://www.youtube.com/thesoriameffect4
Spanish Beauty Channel: https://www.youtube.com/channel/UCVp5erjTu3sPPV7pGKjOP8w
Vlog Channel: http://YouTube.com/SoriamTV


|| FOLLOW ME ON SOCIAL MEDIA ||

Instagram: https://instagram.com/the_soriam_effect/
Facebook: http://facebook.com/thesoriameffect
Twitter: https://twitter.com/SorrriamArrrce
Pinterest: http://www.pinterest.com/soriamarce/