Wednesday, September 28, 2016

15 Hour Wear Foundation Tutorial | Full Coverage Foundation Routine

I have been really into rocking a full coverage base this summer, so I wanted to show you guys how to get this same effect.

I include all the products in the video!


|| YOUTUBE CHANNELS ||


|| FOLLOW ME ON SOCIAL MEDIA ||

Tuesday, August 30, 2016

Becca x Jaclyn Hill Champagne Collection Face Palette | Beauty Favorite of the Week

I absolutely live for this face palette! This face palette is quickly becoming one of my favorites.
I picked up the Becca x Jaclyn Hill Face Palette on a whim when I was at the mall a little over a month ago. It had been out for a while, and I was trying to keep away from it since I don't like things that are super trendy.

But after it was out for a while I looked at it in store and I actually really like the colors in the palette, especially when it came to the blush colors.

I have been using this palette pretty much every day that I wear makeup, which is like everyday. I definitely am obsessed. This palette is so beautiful, the blush colors are amazing and the highlight shades are gorgeous. I am also a sucker for pretty packaging, and of all the palettes that I own this one takes the cake. I love displaying it on my vanity!

It comes with three blush shades and two highlighters. The blush shades are different enough and they even have different finishes on the skin making each one unique. There is a more gold highlighter and a pink highlighter. I love the options. I even use the highlighters as eyeshadows sometimes.

The powder itself is super high quality. The colors are pigmented and they go on the skin smooth and creamy, and they blend like a dream. When you do blend out the blush colors they don't completely disappear off your skin.

The colors last all day on my cheeks and it doesn't get blotchy or patchy throughout the day.

Overall this is a definite winner, and I am so glad that I got it while it was available.

|| YOUTUBE CHANNELS ||

Beauty Channel: https://www.youtube.com/thesoriameffect4
Spanish Beauty Channel: https://www.youtube.com/channel/UCVp5erjTu3sPPV7pGKjOP8w
Vlog Channel: http://YouTube.com/SoriamTV


|| FOLLOW ME ON SOCIAL MEDIA ||

Instagram: https://instagram.com/the_soriam_effect/
Facebook: http://facebook.com/thesoriameffect
Twitter: https://twitter.com/SorrriamArrrce
Pinterest: http://www.pinterest.com/soriamarce/
Tumblr: http://sosoriam.tumblr.com

Friday, August 26, 2016

How to Wash Your Makeup Brushes

This little task of deep cleaning my makeup brushes is one that I don't particularly love to do. Although it is super necessary it is still a pain in the butt to do, especially when you have an ever growing collection of makeup brushes.

Washing your brushes with soap and water is so important though. This ensures that you are not reintroducing allergens, bacteria or any other gross thing back on to your face. I think this is much more important when it comes to the face brushes. Face brushes are the ones that are constantly used with liquid or cream products that can collect all kinds of bacteria and gunk.

In the video I show you how I like to wash my brushes. It is simple, doesn't take much time and the best part, it's cheap!

There are plenty of mitts or gloves or mats out there that are designed to help wash your brushes, but those things can be pretty pricey. I use the Real Techniques Brush Cleansing palette which was less than $15 on amazon (linked below.) This is the cheapest and most effective way that I have come across, and I love it.


Stuff I used:

Dirty face brushes
Dirty eye brushes
Water 

|| YOUTUBE CHANNELS ||

Beauty Channel: https://www.youtube.com/thesoriameffect4
Spanish Beauty Channel: https://www.youtube.com/channel/UCVp5erjTu3sPPV7pGKjOP8w
Vlog Channel: http://YouTube.com/SoriamTV


|| FOLLOW ME ON SOCIAL MEDIA ||

Instagram: https://instagram.com/the_soriam_effect/
Facebook: http://facebook.com/thesoriameffect
Twitter: https://twitter.com/SorrriamArrrce
Pinterest: http://www.pinterest.com/soriamarce/
Tumblr: http://sosoriam.tumblr.com

Wednesday, August 24, 2016

Bold Brows using ABH Brow Wiz

Eyebrows are definitely my favorite thing to do when it comes to makeup. They can really make or break a makeup look. This tutorial is showing you how I like to rock a bold brow. I have been really loving the darker bolder brow trend, and in the video I show you how easy it is to achieve this fun look. 


I used the Anastasia Beverly Hills Brow Wiz in the color Dark Brown, and then I set them with the NYX brow gel in the color Brunette. 

This combo has been a favorite of mine this summer. It is so fast and easy to get my eyebrows done! 


Wednesday, August 17, 2016

Long Layers Haircut | Behind the Instagram


The long layered haircut is probably my favorite haircut to do. It gives the hair so much body and movement, and makes the hair look 10 times thicker than it did before. 
This client is the same one from my Brown Ombre post, she came back to get her haircut, since we didn't have the time to do it when I colored her hair. 

Her hair was about down to her lower back. You can see in the first picture below that it looks very thin and flat.

I started by making sure her hair was completely wet. Then I sectioned her into a T parting from the top of her crown down towards her ears. I pinned the front two sections out of the way and started on the back first. 
I always like to trim the hair to the length that the client wants before I get into the body of the haircut. I took the back section and parted her hair from her left ear all the way across horizontally to her right ear. I like to take a big enough section to go through this as a rough cut pretty quickly. I took off about 3 inches of her length. I took down more sections working my way up the hair until her hair was one even length all over. 

Once I had the trim in, this is when I like to start layering. Always ask the client how short they want their shortest layer to be before you start chopping off hair every which way. My client wanted longer layers this time. 
To cut long layers I like to start at the top of her head with the back section. I divide about an inch section from the crown horizontally, this will be my guide for the shortest layer. 
I comb the hair straight up as perfectly as possible, and check to see how short the layer will be. I grip the hair tightly and bring it down to see where it will be once it is cut. 
I comb that section straight up again and I point cut that first layer. I took about 5-6 inches off for that first layer.
To continue the layering, I parted the hair from the top down vertically about 1-2 inches thick. I combed the hair straight up to the length of the original guide of the shortest layer. I go from the center to the left and then from the center to the right.
I worked my way down to the nape of the head, combing everything up to that original guide at the top of her head.

For the front sides, I like to part the hair from the center middle back to create a triangle shape. I angle the hair back at a 45 degree angle instead of the 180 degree angle that I did the back of the haircut. I do this because I don't like taking too much length off the front since there is much less hair in those front sections than the back.
I also don't cut the layers in 3-4 fingers above the ears. Again this is to make sure we leave some fullness and length in the front.

After the cut is completed, I like to blow out her hair and give it that body and curl with my round brush and blow dryer on the highest heat setting. And that's the end of the haircut.

I love this haircut, it is definitely my all time favorite haircut and blow out to do on my clients.  


|| YOUTUBE CHANNELS ||


|| FOLLOW ME ON SOCIAL MEDIA ||


Friday, August 12, 2016

Easiest & Cheapest Way to Wash Beauty Blenders!!


In this quick video I show you the way I like to wash my Beauty Blenders. These makeup sponges are seriously amazing. But keeping them clean, fresh and stain free can be a hassle and sometimes really expensive.

You could be the Beauty Blender brand soap that they sell at Sephora or Ulta, OR you can use this super inexpensive soap to get your Beauty Blender clean!

What I like to use to wash and maintain my Beauty Blenders is a soap called Pink Zote, I picked this up at Walmart for under $1!! Seriously you can't beat the price and the amount of soap that you get.

The soap is super gentle and it doesn't irritate my skin at all. As long as you completely rinse out the makeup sponges when washing them, I don't see you having any problems with it!

Thursday, August 11, 2016

Summer Get Ready with Me | Makeup & Hair


My latest YouTube video is this Summer time Get Ready with Me. I love making these types of videos because they are my favorite to watch!

Check it out below:


|| YOUTUBE CHANNELS ||

Beauty Channel: https://www.youtube.com/thesoriameffect4
Spanish Beauty Channel: https://www.youtube.com/channel/UCVp5erjTu3sPPV7pGKjOP8w
Vlog Channel: http://YouTube.com/SoriamTV


|| FOLLOW ME ON SOCIAL MEDIA ||

Instagram: https://instagram.com/the_soriam_effect/
Facebook: http://facebook.com/thesoriameffect
Twitter: https://twitter.com/SorrriamArrrce
Pinterest: http://www.pinterest.com/soriamarce/

Friday, July 29, 2016

NYX Liquid Suede Lipstick | Beauty Favorite of the Week

This weeks beauty favorite is the NYX Liquid Suede Cream Lipstick in the color Sandstorm. I have been using this liquid lipstick to death, literally everyday. It is one of those colors that's like your lips but better! It is so easy to use, I don't have to fuss with it, I usually apply a little from the doe foot applicator and then blend it in with my finger all over my lips.
It looks awesome, it applies beautifully. It is so easy to grab it and go. My favorite thing about it is that since it is a liquid lipstick, it is matte and longwearing. I can apply it early in the morning and not need to apply it for like 5-6 hours. That is my kind of lip product.

I have been super impressed with NYX as a whole recently, I think that they really have stepped it up when it comes to their products and availability.

Basically I love this lip color and for the price you can't really go wrong!


|| YOUTUBE CHANNELS ||

Beauty Channel: https://www.youtube.com/thesoriameffect4
Spanish Beauty Channel: https://www.youtube.com/channel/UCVp5erjTu3sPPV7pGKjOP8w
Vlog Channel: http://YouTube.com/SoriamTV


|| FOLLOW ME ON SOCIAL MEDIA ||

Instagram: https://instagram.com/the_soriam_effect/
Facebook: http://facebook.com/thesoriameffect
Twitter: https://twitter.com/SorrriamArrrce
Pinterest: http://www.pinterest.com/soriamarce/


How to Get Long Lashes Without Falsies!

Having long lashes is something everyone wants, but if you don't want to have to deal with false lashes here are some of my tips to make your lashes longer.

Mascara

Using a good mascara is key to make your lashes look longer. Check for mascaras that say things like "lengthening" or "voluminous." My absolute favorite mascara for lengthening is the Maybelline Lash Stiletto Mascara. This mascara really builds on itself and creates length that doesn't get clumpy. 
Layering Mascara

Another trick is to layer your mascara. I like to layer at least 3 coats of one or two different mascaras. Having only one coat of mascara really doesn't do much as far as making them stand out. Layering builds the mascara on itself creating the illusion  of longer thicker lashes. 
I have been layering my previously mentioned Maybelline Lash Stiletto with the L'Oreal Voluminous Carbon Black mascara. These are excellent together. 


Oils

Using Castor oil, coconut oil, olive oil, avocado oil, sesame oil, argan oil, will moisturize your lashes and make them grow longer. Soak a cotton ball with your oil of choice and wipe over your clean lashes before bed, then wash off in the morning. The natural oil will moisturize, nourish and help the growth of your lashes while also making them stronger and healthier.


Green Tea

Green tea can also help make your lashes strong and healthy. Make some green tea, let it cool and swipe if over your lashes with a cotton ball. The caffeine will help maintain the growth of the lashes and will stimulate new growth.


Removing Makeup

A great way to have longer lashes is to make sure that every night you are removing all the old mascara buildup from the day. Using a cleansing water or makeup remover is the best way to get rid of mascara. Having clean lashes while you sleep will help them grow when they need to.


Leave them Alone

Being gentle with your lashes isn't always the easiest thing to do, but avoiding rubbing your eyes or pulling on the lashes when removing your makeup can make a huge difference. Rubbing and pulling on your eyes can cause premature wrinkles and fine lines to the skin around your eyes as well as pulling out some lash hairs. This can stunt the growth of the lashes.


|| YOUTUBE CHANNELS ||

Beauty Channel: https://www.youtube.com/thesoriameffect4
Spanish Beauty Channel: https://www.youtube.com/channel/UCVp5erjTu3sPPV7pGKjOP8w
Vlog Channel: http://YouTube.com/SoriamTV


|| FOLLOW ME ON SOCIAL MEDIA ||

Instagram: https://instagram.com/the_soriam_effect/
Facebook: http://facebook.com/thesoriameffect
Twitter: https://twitter.com/SorrriamArrrce
Pinterest: http://www.pinterest.com/soriamarce/

Monday, July 25, 2016

Angled Bob Haircut | Behind the Instagram


This haircut was super fun to do. In the before picture you can see that my client had medium length hair. She has very thick hair, and a lot of it. So going from a longer cut to a much shorter haircut can be difficult for someone with thick hair like this. Texturizing with point cutting or texturizing shears is key in a haircut like this one.

I started the haircut by cutting in the base shape and getting rid of the length. I sectioned from the crown to her ears and worked on the back first. I divided the back section into two down the middle. Then I took small subsections from that center part down to the nape at a 45 degree angle. I took off about 5 inches from the middle back to start. I combed out the section I was going to cut and I angled it towards the center of the part at the same angle as the subsection part.This technique creates the A-line shape of the hair cut. It keeps the hair farthest away from that middle part line longer than the hair closest to the part line. When the first small section is completed it should look like a long arc, not straight across.

I work in clean small sections on the left side then on the right side alternating them the whole way up the hair in the back of her head.
When I had the back done, I moved on the the front sections. Again I took diagonal subsections from the front above the ear and used the hair from the back as my guide to connect the front with the back. I over-directed these front sections so they would stay pretty long in the front.
Once the base of the cut was done, I went in to texturize and add some layers. With thick hair like this, texturizing is a necessity to make the hair cut look the way you want. 

I went in vertical sections starting in the middle back and I point cut out at a slight 45 degree angle (almost 90 at times) to give the hair that stacked effect without getting too short. I did this same thing around the whole back of the head.

To finish the hair cut, I did a tiny bit of face framing and layering throughout the hair so it wasn't too heavy. Making sure to run my hands through the hair to feel for any thicker or heavier sections.

The final touch was a quick blow out and flat iron to smooth everything out. After I finish a cut I like to go back and make sure that everything is where it needs to be, and if something needs to be adjusted this is when I take care of it.


|| YOUTUBE CHANNELS ||

Beauty Channel: https://www.youtube.com/thesoriameffect4
Spanish Beauty Channel: https://www.youtube.com/channel/UCVp5erjTu3sPPV7pGKjOP8w
Vlog Channel: http://YouTube.com/SoriamTV


|| FOLLOW ME ON SOCIAL MEDIA ||

Instagram: https://instagram.com/the_soriam_effect/
Facebook: http://facebook.com/thesoriameffect
Twitter: https://twitter.com/SorrriamArrrce
Pinterest: http://www.pinterest.com/soriamarce/

Friday, July 22, 2016

Stila Stay All Day Liquid Liner | Beauty Favorite of the Week

My beauty favorite for this week is the Stila Stay All Day Waterproof Liquid Eyeliner.
I have had this for quite a few months and it is still going strong. I am loving this liquid liner, it is the only one I have been using the past couple of months. It's super black and intense, not too runny. It also has not dried at all, or on the felt tip like other liquid liners tend to do sometimes.

This liner has a super fine felt tip and it gives me the bessssssst crisp line for my winged cat eyeliner!
I love that it is waterproof, so it is very long lasting and doesn't budge even in the summer heat.

I am so impressed with how long this liner has lasted! It is definitely my favorite liquid liner and I will for sure be repurchasing it when I run out!

Tell me what your favorite beauty product is lately!


Tuesday, July 19, 2016

Brown Ombre | Behind the Instagram


This hair color is one of those that are very difficult. My client came in with black box color in her hair. She has been putting this black color on her hair for a few years. 
Black box color is one of the worst colors to put in your hair. Box color in general is made as a "one size fits all" when it comes to hair texture and color, so these chemicals are the strongest and most damaging to the hair. You would never know it since when you finish the at-home color, it looks "healthy" and "shiny." But this is an illusion, and getting rid of box color is not as easy as some may think.

As you can see in the picture below, the client had very long black hair. She has thin hair texture and she didn't want a drastic haircut, just a small trim.
To lighten her hair I mixed up my Matrix lightener with 20 volume developer. I wanted to use a very low developer because since her hair had so much black color on it, I didn't want to damage the hair more than it needed it. And since our goal color was a medium brown I didn't need to lighten the hair too far. We mainly just wanted to remove as much of that black color as we could. 

We let the lightener process for 45 minutes, and I made sure to keep an eye on the hair as it processed.

After washing out the lightener, I quickly rough dried her hair with my blow dryer and we went in to tone the hair.
With just the bleach the hair had lightened very unevenly and spotty. Some spots where still pretty dark and others were an orange tone.
She was going for a black to brown ombre, so we went in with Matrix 6A and 10 volume developer as the toner. I used 6A because we were going for a light/medium brown and we also were trying to cancel out as much of that unwanted orange tone with the ash. 
I let the color process for the full 35 minutes to make sure we got as much color pay off as possible.

The last few steps were to give her a quick trim and a quick blowout.

The blend between the black and the brown was very soft and pretty, I really enjoyed doing this color. It was a challenge and it took a few hours, but in the end it turned out like what the client wanted. 


Friday, July 8, 2016

The Brow Wiz | Beauty Favorite of the Week

Beauty Favorite of the Week

I have gone back to one of the products I used to rave about a while back when it came out. I am talking about the Anastasia Beverly Hills Brow Wiz eyebrow pencil.
I recently went on vacation, and when I was packing up my makeup I didn't want to over-pack. So instead of packing my eyebrow brush and the eyeshadow and my eyebrow gel, I decided to bring along my Brow Wiz instead. This would be a lot quicker and a lot less stuff to pack for my vacation.

I have fallen back in love with this product. I have reviewed the Brow Wiz previously, check out the post here: Review, Tutorial

I have it in the color Chocolate, this color is perfect. It matches my hair color but isn't too dark. I like that it stays all day long, doesn't smudge or wear off. It also works as a color and gel at the same time. It holds my eyebrow hairs in place.

I have been using it every single day. It has also really helped me speed up the time it takes me to do my makeup since I was able to cut out a bunch of other steps!

The ABH Brow Wiz gets a 10 out of 10 for me!


|| YOUTUBE CHANNELS ||

Beauty Channel: https://www.youtube.com/thesoriameffect4
Spanish Beauty Channel: https://www.youtube.com/channel/UCVp5erjTu3sPPV7pGKjOP8w
Vlog Channel: http://YouTube.com/SoriamTV


|| FOLLOW ME ON SOCIAL MEDIA ||

Instagram: https://instagram.com/the_soriam_effect/
Facebook: http://facebook.com/thesoriameffect
Twitter: https://twitter.com/SorrriamArrrce
Pinterest: http://www.pinterest.com/soriamarce/
Tumblr: http://sosoriam.tumblr.com

Wednesday, July 6, 2016

Caramel Balayage | Behind the Instagram

I have been doing more hair coloring recently, and I thought that it would be fun to talk a little about the pictures I post to Instagram and tell you what I did and what I could possibly do better. 
This post is the first one in my Behind the Instagram series. I will be doing this for some of my favorite Instagram pictures.

During the consultation for this color she told me that she wanted to have a caramely blonde balayage that would transition into an ombre at the ends. She also wanted a haircut to match her new color.

This client came in with virgin hair at a natural level 3(warm) and the length was about to the middle of her back. Before I did the color I dry cut about 5 inches off the length. This is a great way to make sure you are not wasting color/lightener. If I would have done the color first and then the cut, I would have probably cut off all her ombre ends. 
A good tip when getting to know what the guest wants is to make sure you know exactly everything she wants and you can even suggest things that maybe the guest might not have thought of. Make sure to cover all the bases before starting any service. This will make it very easy to know what to do and when.

Once I had the base of the cut done, then I went in with the lightener. When it comes to a balayage or ombre, the key is to make the light and dark colors blend seamlessly together. 
I always try to work off of the clients natural color as much as possible. This sort of color can work wonders for people that don't have the time or desire to be at the salon getting their re-growth touched up every 4 weeks.

Unlike traditional highlights, balayage highlights don't go the whole way up to the scalp. This gives it a very soft natural look to the color, and makes it grow out beautifully. 

Since this client has a smaller head, and about medium to fine hair I was able to take inch and a half sections. starting from the back nape of her head and working my way up.
I sectioned off a mohawk section from her forehead to her crown. The rest of the hair I section in a regular T part. 
The trick to blending the highlights into an ombre is to grip the hair as tight as possible, then add the most lightener to the midshaft of the hair in a V or W shape, very carefully blending the lightener up the hair shaft up to where you want the highlights to start. Then making sure that the ends are completely saturated. I like to keep the lightener only on the surface of the section that I am working on, only saturating the ends of the hair. This will make the blend between the natural color and the lightened color seamless.

After the lightener was applied, I watched it process to make sure it gets to the color I want it to be.
Once it was done, I washed and conditioned her hair then finished her haircut by giving her long layers to compliment the color. 

Since this client had virgin hair, I didn't have to tone the color to get to the desired shade. 

Overall, I really liked how this color turned out. The blend between the lighter color and her natural color is completely seamless. 


|| YOUTUBE CHANNELS ||

Beauty Channel: https://www.youtube.com/thesoriameffect4
Spanish Beauty Channel: https://www.youtube.com/channel/UCVp5erjTu3sPPV7pGKjOP8w
Vlog Channel: http://YouTube.com/SoriamTV


|| FOLLOW ME ON SOCIAL MEDIA ||

Instagram: https://instagram.com/the_soriam_effect/
Facebook: http://facebook.com/thesoriameffect
Twitter: https://twitter.com/SorrriamArrrce
Pinterest: http://www.pinterest.com/soriamarce/
Tumblr: http://sosoriam.tumblr.com

Friday, April 1, 2016

Blue Ombre Eyeliner & Lips Makeup Tutorial


I have had this look on my mind for a few months now. I am so excited to show you how I did this really fun blue winged liner and extremely bold blue lips!
Check out the video below and also the list of products I used!!


Products used:
MAC Paint Pot - Painterly
Urban Decay X Gwen Stefani Palette
Too Faced Chocolate Bar Palette
iMagic Cream color Palette
 -Dark Blue
 -Light Blue
 - Black
Maybelline Master Primer
L'Oreal Infallible Pro-Matte Foundation
L'Oreal True Match Foundation
Maybelline Fit Me Concealer
Urban Decay Electric Palette
MAC Carbon Eyeshadow
Laura Mercier Secret Brightening Powder
Revlon Nearly Naked Pressed Powder
Kat Von D Shade & Light Palette
Elf Blush Quad
The Balm Mary Lou-Manizer
L'Oreal False Fiber Lash Mascara
Ardele Demi Whispie Lashes
Absolute New York Velvet Lippies
 -Rebellious
 -Surf's Up
 -Enchanted

|| Youtube Channels ||

Beauty Channel: https://www.youtube.com/thesoriameffect4
Spanish Beauty Channel: https://www.youtube.com/channel/UCVp5erjTu3sPPV7pGKjOP8w
Vlog Channel: http://YouTube.com/SoriamTV


|| FOLLOW ME ON SOCIAL MEDIA ||

Instagram: https://instagram.com/the_soriam_effect/
Facebook: http://facebook.com/thesoriameffect
Twitter: https://twitter.com/SorrriamArrrce
Pinterest: http://www.pinterest.com/soriamarce/
Tumblr: http://sosoriam.tumblr.com

Friday, March 11, 2016

Eyeliner | Makeup Part 8 | Back to Basics

Eyeliner is probably the skill that takes the longest to master when it comes to makeup. I always hear people saying that they can't get it right or that it's really hard. Well, it is. It probably took me 2 years to get my winged liner down to a science and even after 6 years of playing with makeup I still mess it up sometimes. The key to eyeliner is practicing. And don't worry too much, like I always say, it's just makeup. If you mess up, just take it off and try it again.
I am going to be going through all the eyeliner products that are available on the market right now, and how and when to use each product.

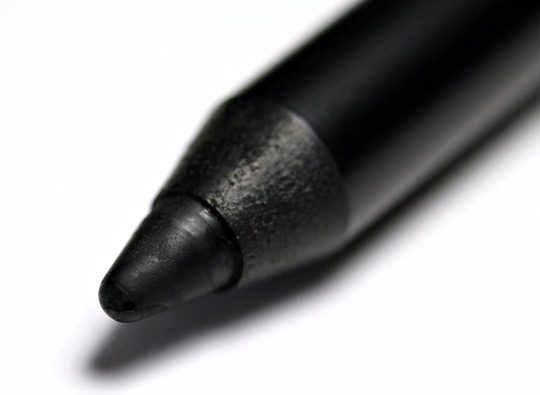
The classic kohl eyeliner pencil is first on the list. This products has been around for a million years, at least. It is the main product people think of when talking about eyeliner. Basically all makeup brands carry a regular pencil liner. You can get them at the drugstore, beauty supply stores or at higher end places like Ulta or Sephora.
 
One of the best ways to use a pencil eyeliner is on the waterline of the eye and as a smudge color. These kind of pencils can range from super dry and hard to use, to very creamy and blendable. Depending on which one you happen to have, you can use it for those different things. If a pencil is too dry than it can pull on the eyes which could hurt and could cause premature wrinkles. If your pencil is too hard to work with, blast it with your blow dryer. This should melt it enough that it won't tug at your skin. But don't make it too hot, that wouldn't feel too good.
If you have a pencil that is way too creamy, try using a liner brush to apply the liner with. Dab your brush into the tip of the pencil and then simply apply. This is great for beginners since the brush gives you all the control.
If you are using a super creamy pencil you should also set it with an eyeshadow, this will prevent it from moving, creasing or smudging where you don't want it. When you are setting it use a small liner brush and tap the eyeshadow onto the liner.
The great thing about pencil liners is the crazy amount of colors that are available now. I love the range that you get with pencil liners. Like all things there are high-end and drugstore alternatives, but it really doesn't matter. I always make things work for me. Some of my favorite pencil liners are the ones from NYX and also Urban Decay has amazing liners.
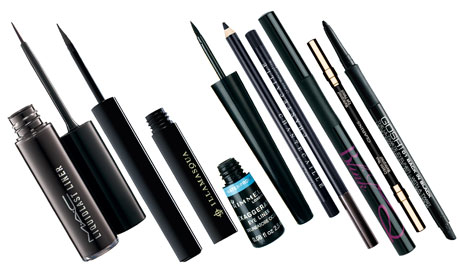
Liquid Liner is also one of those products that have been around basically forever. Mastering the liquid liner technique can be a little difficult and may take time. This also has to do with finding the correct formula that will work for you. Some liquid liners can be a little too heavy which makes getting a clean sharp line hard. Then there are some liquid liners that are so runny that you go to apply it and it just gets everywhere. There has to be a trial and error period with liquid liners. One of the better ones that I have tried is the Kat VonD Tattoo Liner. This liner is super black and very easy to use. The only problem that I have with it is that it is not waterproof.
Finding a liquid liner that is waterproof is the key. If you have a liner that is not waterproof any moisture that comes from your eyes will ruin the liner. I find this especially true for contact lens wearers.
There are liquid liners that come in a pot and the brush is the handle of the packaging, and there are also the liquid liner pens. The only difference is that with the first one you have to dip the brush part back into the pot to get more product as opposed to the pen where the product is part of the applicator.
Both of these products are relatively easy to use and there are great drugstore and high end brands that you can choose from.

Gel Liner is one of the easiest products to use. If you are having trouble getting the winged liner down, try using gel. Gel liner is the happy medium between pencil liner and liquid liner. Gel liner has a thick cream consistency. Where a pencil liner can be hard and dry, a gel liner is very smooth when applying it to the eyes. A gel liner won't tug on the skin (unless it has dried out.) The difference between a gel and liquid is again the consistency. The liquid liner is liquid so it can run and sometimes get where you don't want it. A gel liner will stay right where you put it and it has a slower drying time so you have plenty of time to get it perfect before it completely sets.
You have to use a brush with gel liner, this is great because you have all the control over the product. There are so many great gel liners on the market, you really can't go wrong. I would have to say that the Maybelline Gel Liner is my favorite gel liner. I have also tried the NYX gel liner which is also good. I do like the Maybelline liner better than the NYX liner because the Maybelline one does not dry out. I had a pot of the Maybelline liner and even after a year it was still creamy and worked great. The NYX one ended up drying completely out in a few months.
The other thing you want to keep in mind when it comes to eyeliner is the formula, regular or waterproof. In my opinion I think that waterproof liner is the way to go. Since eyeliner is placed so close to the actual eye ball, it can be a watery situation. If you plan on wearing the makeup all day, or to a place that is hot and that you are going to sweat, or to a place where you will be crying, waterproof liner can really save the face.
The thing with regular eyeliner is that if there is any moisture added to it, it doesn't just disappear, it runs. So making sure you get a waterproof liner is going to keep all that mess off your face.
I suggest using a regular liner when you know for sure you wont be crying or be getting caught in a rainstorm. Non waterproof liner is great if you are only wearing makeup for a short time. Definitely not for super long days.

Eyeliner is a place where you can really be creative, there's the winged liner and its many variations, to the classic line and so on. You can really make your eyes stand out with even just a bit of black or white liner in the water line. It's all in how you use it.


 || Youtube Channels ||

Beauty Channel: https://www.youtube.com/thesoriameffect4
Spanish Beauty Channel: https://www.youtube.com/channel/UCVp5erjTu3sPPV7pGKjOP8w
Vlog Channel: http://YouTube.com/SoriamTV


|| FOLLOW ME ON SOCIAL MEDIA ||

Instagram: https://instagram.com/the_soriam_effect/
Facebook: http://facebook.com/thesoriameffect
Twitter: https://twitter.com/SorrriamArrrce
Pinterest: http://www.pinterest.com/soriamarce/
Tumblr: http://sosoriam.tumblr.com

Wednesday, March 9, 2016

International Beauty Show | New York | March 2016

This is my second year attending the IBS New York event. Last year I went with the group of girls from the beauty school I was going at the time. This year I thought it would be really fun to make it a mother daughter trip, so I brought my mom with me.

This event is held at the Jacob Javits Convention Center in New York City as it always is. It was such a beautiful day, clear skies and a high of about 70 degrees. It was really a great day to be in New York. 
I woke up at around 5am to get ready, I wanted to look cute but stay comfortable since I knew we were going to be doing a lot of walking. We finally arrived at Penn Station in NY at 9:30am. This was my first train trip. The train station in NY was so different than the one in Lancaster. Everyone is running around trying to get to where they are going. It was kind of crazy the rush everyone is always in.  
We decided to walk to the convention center since it really didn't seem like a long walk and it wasn't. It took us about 20 minutes to get there and we were taking our time. It gave us the chance to stretch our legs since we had been on the train for 3 hours. Even though it was pretty early in the day, it already was sunny and warm. 
As we walked from the last intersection to the entrance of the convention center there were crowds everywhere. A lot of people were kind of hanging around, not really doing much outside and in the lobby area of the convention center. 
We already had our wrist bands so we went right in to get started looking at all the booths. 

At first we just made a quick round to get a look at all the booths and to see what was available. I definitely went with the intention to spend some money. I love seeing new things and being at a beauty show you can really hold things and try things out before you buy. 
There is such high energy from the educators that are on stage teaching a crowd to the sales associates that are there to answer any and all questions about their product. I love that everyone is so friendly and eager to get the sale.
There was so much to see that we didn't really get anything for a while. We did a lot of browsing and taking in the atmosphere. Once we had gone around the whole place we were pretty hungry. We went back outside and got some chicken kebabs and we ate right in front of the convention center.
We definitely did a lot of people watching. In an industry that is all about creativity and art you are bound to see some interesting people. Sometimes we would just stand around watching people, especially when we were waiting in lines for things.

I ended up getting a few things. I wasn't in need of anything so everything I got was just fun stuff I wanted to get.
One of my favorite purchases was the makeup brushes I got. I love makeup brushes and you could never have to many. Since I do freelance makeup every once in a while it is great to be able to get quality brushes on the cheap.
I got about $80 worth of brushes from Crown Brush. I have some I got last year at IBS and I really love them.

I also got a new flat iron. This was one of those impulse buys. I didn't really need it but for $80 you can't go wrong. The guy that sold me the flat iron also threw in a couple of free shampoos.

I also got some lip products. I don't know if these are liquid lipsticks or if they are just matte lipgloss', but I got 5 super fun shades. I wanted to give these crazy colors a try. They were 5 for $20.

We walked around and shopped for a good 5 hours. There is so much to see, but there is also so many people that it sometimes got hard to shop or even just look around. The makeup brush booth was probably the worst one when it came to crowding. People were literally not moving. It got old really fast. When I was getting the brushes that I wanted, I had to squeeze my way to the table grab and go.
 With so many people in one place, you expect to run into the rude and annoying ones as well.
After being inside for the better part of 5 hours, we decided to take a walk to Time Square to enjoy the beautiful day and the city. It honestly was the perfect day to be outdoors. The amount of people on that island is just insane. There were so many people out and about, I almost forgot it was only Tuesday. I can't wait to bee in the city during the weekend.
We had a blast just people watching as we got closer to Time Square. We wanted to check out the amazing buildings so naturally we ended up in H&M. I love that a lot of the stores in NY are multi-level. We hung out there and shopped for a little bit. Then we wondered out into the street and ended up in a Forever 21, we got a few things there as well. Our final stop was at one of my favorite makeup stores MAC. I wanted to just take a look but ended buying one of the pro longwear concealers and a paint pot.


As it was getting late in the day we wanted to get some food and sit down for a while before heading back to catch our train in the evening. I spotted a TGI Friday's on one of the side streets, and we got some dinner there.
My mom had some ribs and fries, and I had a chicken caesar salad. We were finally sitting down and it was fabulous. We had been on our feet since 9am and it was about 4pm when we finally got the chance to sit.
We took our time eating, and once we were done we started making our way back to Penn Station. On the way back we spotted a Macy's and since we still had plenty of time, we went in to check it out. We browsed for a little while and then we were off again.

We got to the train station a little earlier than we expected so we just hung out and did more people watching.
We finally got on our train at 6:30pm and we got to Lancaster at 9:30.

All in all it was a great day trip. It was a perfect day and we had a great time in a beautiful city.
We are already making plans to go back!